… little bit of this, little bit of that, a whole lotta about the kids

Category Archives: Crafting

I try very hard to be helpful to my kids’ teachers.  I donate my time for volunteering as often as they will have me, give little gifts throughout the year, from useful things to comfort items, conference day survival baskets, and so on.  This year, my daughter’s teacher is new.  Not just new to our school, but it’s her first year as a classroom teacher.  Her classroom is a bit barren, and her classroom library is tiny, few group crafting supplies, etc.  She got some things from other teachers in the school, paid for some stuff out of pocket.  Eventually, she will get a classroom grant from our PTA (all our teachers get this), but since she is new, and its an EXTRA teacher, not just a replacement for a retired teacher, it wasn’t in the budget yet.

So for back to school night, she wanted to put up some kind of wish list with items she really needs, in case parents who were able to could help.  So I made her a poster board she could use for that.

donate1

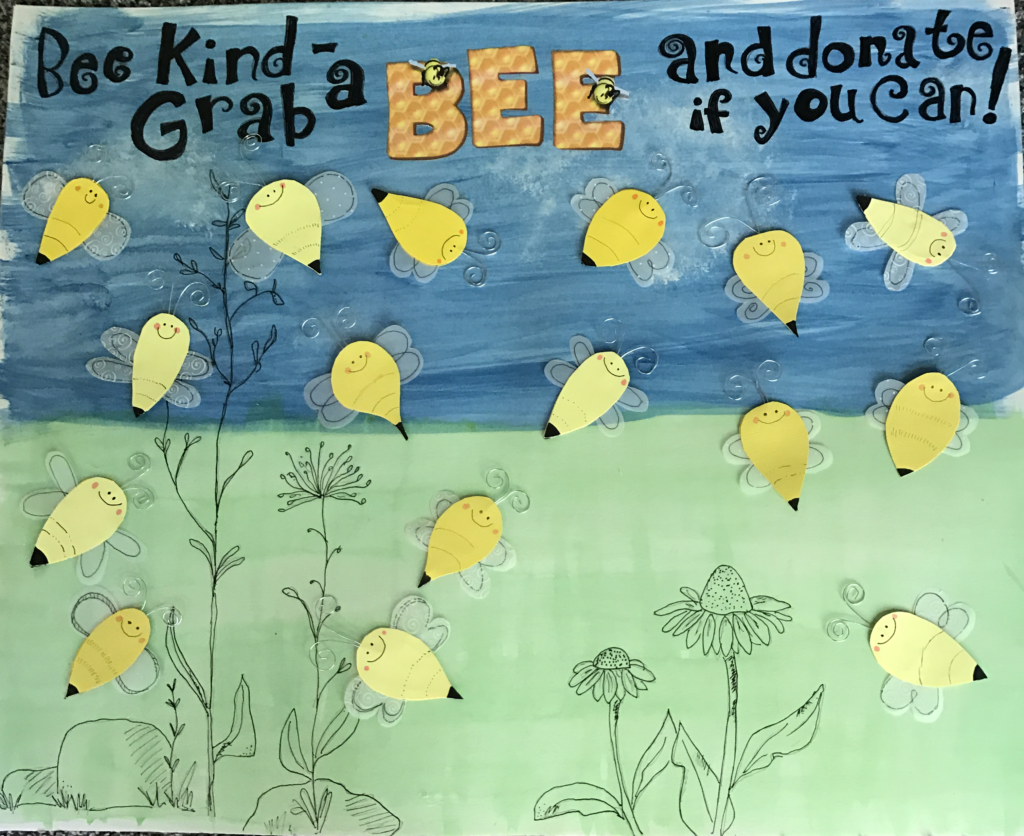
She has no classroom theme or color scheme, so I just made what I liked, and right now, that is bees.  I had a piece of poster board on hand and I painted the background with liquid watercolors, and when it was dry, lightly sponge painted some clouds with white acrylic.  This DID cause the poster board to get all bumpy and curled, but since I was planning on running it through the laminator, that was no big deal.

I drew on the wild flowers / meadow plants and the black lettering by hand.  The honeycomb “BEE” I printed out and trimmed and glued on.  Then I laminated the background at the school.  As expected, the heat and pressure flattened the board right back out.

The bees I constructed separately, so she could write what she needed on their bodies and then add them to the poster with double sided tape.

donate2

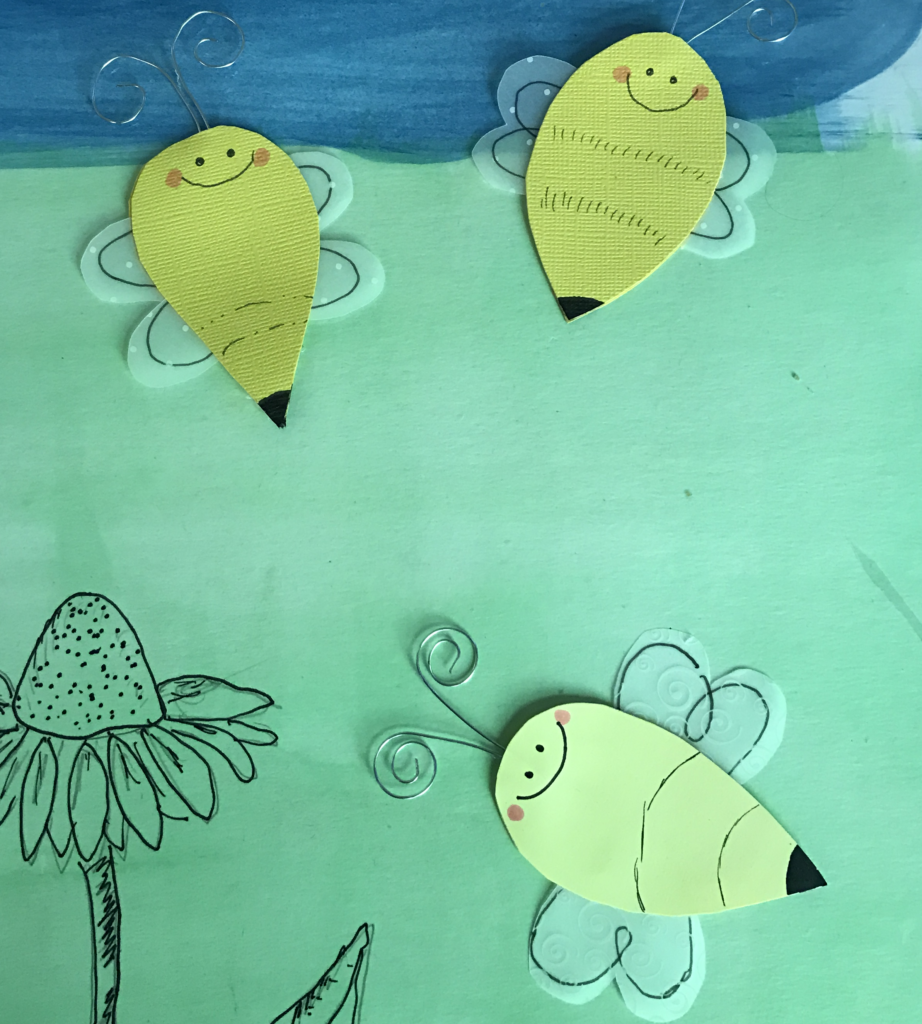
For the bees I made the antennae from wire I happened to have, and created the wings from vellum scraps.  I cut two pieces of yellow cardstock (a variety of yellows, just what I had on hand), drew in the bee details, then glued the front to the back with hot glue, wedging the antennae and wings in between the two pieces.  I made about 30, which was all my fingers could take curling the wire, since I made all the antennae at one time.

Anyway, I thought it came out very cute =)


We’ve been doing a fair amount of salt dough creation.  Right now we are working on an Easter egg tree.  We made salt dough eggs, and have painted them a base color.  We’ll be adding accents later.  Kidlet and I will be exploring glass etching to decorate the vase we are using to hold the twig “tree”.

iphone 33 074


This week Open Ended Art is Non-Open Ended Art — Lets see turkeys.  I decided to do a re-make of an activity we did a few years ago.  Sadly, I couldn’t find any pictures of the finished product last time; it would be neat to see then and now!

Once again only about half my pictures came out, so I don’t have the contruction shots of the actual bag, or very many of him actually decorating, grr.   I set up the turkey for the most part by myself.  Then over the course of 3 days, I asked the kidlet if he wanted to make more feathers.  It was a little “open ended” in that I put out a bunch of different supplies – markers, paints, beads and glue, feathers, stickers, collage materials, tissue paper and contact paper, etc.  I let him cut out the feathers from colorful cardstock and decorate them however he wanted.

005

015

017

018

This is our final product.  Didn’t it come out great?  Now I just need to line it with some pretty fall napkins and fill with rolls for a Thanksgiving meal!

Brown Bag Turkey Bread Basket


Brown paper bag

Cardboard 

Paper plates

Stapler

Glue

Colored paper

Decorations (such as glitter and stickers)

Red balloon

Craft eyes


Cut feather shapes out of the construction paper. You can make a stencil out of the cardboard to make it easier to ensure all the feathers are the same size and shape. Cut out a variety of feather colors. Use glue and decorative items to decorate the feathers as you wish. You may use glitter, stickers, markers, crayons, other pieces of paper, or paint to create your own unique look. Set the feathers aside to dry after decorating them. Cut down the corners of the paper bag, making sure the cuts end about 8 inches from the bottom of the bag. Trim off the top few inches. Then fold the bag over, so all the sides line up and the excess is folded over to reinforce the sides. Each side should be double or triple the thickness it was originally. Cut a piece of cardboard that is the same size as the bottom of the bag. Insert it carefully into the bottom of the turkey basket, making sure it lays flat and also holds down the edges of the folded sides of the turkey-table-topper-thanksgiving-craft-step4-photo-150-FF1105THANKA24paper bag. Insert a paper plate along the inside back portion of the bag. This is where the turkey’s tail will be. Staple the plate in place. Make sure that plate is touching the bottom of the bag. [I didn’t have plain white paper plates, I ended up using a small paper bowl for the inner tail] You may need to fold the plate to fit it inside the edges of the bag. Staple another plate to the outside of the bag, making sure it is elevated about the edge of the inside plate. This allows you to have two tiers to make up the turkey’s tail. Fold two paper plates in half and staple them over the long sides of the bag. These will be the turkey’s wings. Fold another paper plate like a cone. Bring the two sides in until they meet in the middle, then crease the edges, so there is a sharp point at one end, and a rounded ridge at the other end. Fold down the pointed end about turkey-table-topper-thanksgiving-craft-step3-photo-150-FF1105THANKA232 inches to create a beak for the turkey. Staple the plate to keep the folds secure, and then staple the turkey head to the front of the paper bag. Glue craft eyes onto the turkey’s head, and glue the red balloon onto the neck of the turkey to look like a wattle. Color all the paper plates brown, using either paper or a brown marker. Glue the feathers you created earlier to the two levels of the turkey’s tail (the back two paper plates). You may attach as many or as few feathers to the turkey tail as you would like. Allow the entire craft to dry before filling the bag with bread or whatever you wish to serve from your turkey decoration for Thanksgiving dinner.


Open Ended Art is hosted over at Mommies Wise Little Bookworms.  Be sure to check out the linkie to see all the other great projects!


KFF

A few months back, Family Fun Magazine had a project to create the “Ultimate Homework Station“, using a tri-fold display board (often used for presentations, found in office supply stores).  Thier version was designed to actually store all the supplies needed for homework, and then to fold up for easy storage.

I don’t really need it for its original purpose.  I have an inexpensive short tower of drawers that I use to keep all our homework and learning materials together.  But I am always juggling reference items when he is doing his homework and practicing academic skills.  Since we are working so hard on his handwriting, having the handwriting card easily visable during work time is vital to us.  Horizonally on the table, it would get shuffled under other papers, mislaid, and beat up.

009

So I altered the idea of the homework station to provide a space for reference materials.  A few things are permanently affixed (the plastic sleeve the handwriting card is in, but the card can be switched to something else, the large paper clips holding the cards on Oregon, Washington and California, but of course the cards can be changed, the red envellope on the right that currently holds parts of speech cards, the “blackboard” paper with the sight word post it notes) but the majority of things are attached with repositionable adhesive so that I can easily change things out as he masters whatever topic is highlighted on the board at the moment.

When our formal learning time is over (and he is only five, and in Kindergarten from 8 until 2.  Formal “homework” and academic time is limited to what he can tolerate, often only 10-15 minutes), I can fold the board up and tuck it behind the tower of drawers for storage.

In addition to making the information easy to spot, I am hoping that the board will help shield him from distraction.  I *just* made this and haven’t had a chance to see how well it works with the Kidlet, so we shall see!

This post is linked to Kid Friendly Friday at I Blame My Mother.  Check out this weeks linky for more kid friendly ideas!

On a side note, Kidlet is really *really* struggling with his handwriting.   We practice every day.  I have three different books that I use for worksheets, I create my own on wide ruled paper that tie into to whatever phonic sounds they are learning that week, and outside of formal learning time I have him helping with making shopping lists, writing letters for grandparents, etc and I have offered lots of fun fine motor activities. At this point, I’m not sure it is those fine motor skills that are lacking.  He has no difficulty manipulating small items, using tongs to sort marbles, doing puzzles, operating eye droppers for eye dropper art, cutting with scissors, or any of the plethora  of “fun” activities I have contrived in our pursuit of legible penmanship.  He is a whiz with a keyboard and mouse, or with game controllers.  He can also *trace* letters just fine, with very little wavering or going off the lines.

He brought home the class ‘pet” (a stuffed animal in a dog carrier LOL) and with him came a journal that each child writes in to record the happenings with the pup. If you’ve ever seen your dog suffering and felt helpless, you may want to consider looking into the organic cbd oil for dogs to help your pet. It really hit home how truly atrocious my son’s writing is seeing it side by side with the other children’s entries.  He has no trouble composing his thoughts on what to write.  He spells things correctly (when you can read it to tell!).  He just has a terrible scrawl.  Letter formation, sizing, spaces between words, and line-alignment are all off.  I’m at a bit of a loss and would welcome any suggestions!


We got to open ended art a little late this week. 

I put out a bag of feathers, air drying clay, clay tools, and wiggly eyes.   First he said “With feathers I can make Kevin!” (from the movie “Up”) but that quickly became generic feathered friends once he realized how hard Kevin would be 😉

He made balls with the clay, shaped them with the tools, stuck them full of feathers and stuck on googly eyes.

He kept working on them until he ran out of clay.  I guess it’s a good thing that I only pulled out a handful or so instead of letting him use all the clay in the bucket!

44 and feathers 010

Getting Started

44 and feathers 024

“Funny Bird”

44 and feathers 012

Prepping clay bits

44 and feathers 025

“For Daddy”

44 and feathers 023

The fleet of critters, drying on parchment paper.

Open Ended Art is hosted over at Mommies Wise Little Bookworms.  Be sure to check out the linkie to see all the other great projects!


This weeks open ended art project theme is “Matisse”.  It’s a new thing; Open Ended Art will feature a specific artist once a month.  We read “When Pig-Asso met Moo-Tisse” and “Drawing with Scissors” as well as checking out some Matisse art on the internet to get familiar with his work.

I really loved this project. I’ve always liked Matisse anyway (which is why we had those books on hand already!), and his collage work I always thought was especially stunning.

002

^^ THIS is how almost all of my progress shots came out this week.  Yay?

005

To get started, and show him a bit about the collage work, I first cut a bunch of “matisse inspired” shapes and let him do a collage with those. 

007

I realize that I am biased, but didn’t he do an amazing job?  I didn’t cut the pieces with any kind of picture in mind at all.  And here we have “Mommy Watches Two Baby Birds”.  I really love how this one came out.

After that, I handed over paper and scissors and asked him to make his own shapes for another collage work.  We discussed “organic” shapes, and how Matisse used very few straight lines. 

010003

These are the *only* process shots that aren’t all screwed up, and you can’t see very much.  Sigh!  He cut a lot of long wavy strips, glued several together in bunches, and then attached the mini-collages to the paper.

013

For more great open ended art projects, check out the linkie at Mommies Wise Little Bookworms!


Kid friendly friday is hosted at I Blame My Mother.  Check out this weeks linky to see the projects and ideas that other mom’s have posted!

I think that making book marks is a great activity for kids.  We’ve done it a number of times over the years.  It lends itself to many different themes and mediums. One Christmas I had kidlet make them as gifts, using holiday stamps and glitter.

At my son’s harvest party yesterday I ran an activity table, and bookmarks are what I chose to offer.  I used scrapbook supplies.  I cut card stock and patterned paper to size, gathered up a bunch of embellishments, ribbons and some small rubber stamp alphabets and let the kids decorate them as as they liked.  I have a Xyron Creative Station, so I bought a fresh roll of lamination for it, and took that to help make the bookmarks a little more durable and permanent.

Everyone turned out very different.  (Hopefully I’ll be able to add some process shots later.  I was so busy I didn’t get to take any myself, but another mom did and she said she would email the photos to me).  Here’s a few of them finished:

020

Several of the kids in the class (Kindergarten) said they were starting chapter books and were already using bookmarks and were very excited to have one they made themselves.  Plus, my husband complains about my leaving my books propped open all over the place, so I plan to snitch one of my son’s to use.  I think he’ll get a kick out of mommy using his work!


This weeks open ended art project was pumpkins.  I had a bunch of pumpkin stickers and die cuts left over from the bookmark activity we did at his harvest party, so I pulled those all out, added basic art supplies and let him at it.

003

First he started scribbling all over the page in multiple shades of green.  “Those are the pumpkin vines.”

009

He added pumpkin shapes to the patch.

010

Finally, he decided it needed embellishment.

014

The finished product:

015

He liked making pumpkin patches!

0019

For more great open ended art projects, check out the linkie at Mommies Wise Little Bookworms!


The theme for this week’s Open Ended Art project was simply “black and white”.  Once again I wanted to go with the spirit of the challenge and provide only materials to him, without any specific project in mind, and without assisting or correcting in any way.  He is old enough that it works.  When he was younger I think he would have been at a loss on his own like that.

We started out upstairs in my office / the playroom and he was asking to “make a project”.  I said of course and hey, do you think we could make something cool if we only used black and white? and he said yes we can!  He started rummaging (my scrapbook stuff that isn’t packed up is all over the place), dug out some buttons and some patterned paper.  He asked for scissors and glue.  Then he went to work.

bento 27 and black and white 001

SEE, this is the dipped in dye thing I was talking about when I was complaining about my camera the other day.  Oh Honey, if you are reading this, I need a new camera!  All the in progress shots ended up like that or worse.  At least one of the finished pictures came out!

bento 27 and black and white 002

Once he had everything glued down the way he wanted, we set it aside to dry, but he very earnestly informed me that it wasn’t finished and he needed to “draw in the lines” when the glue was dry.  He had a very clear vision, apparently!

What is it?  It’s a “jungle at night” of course.  He even spelled out “jungle” with scrapbooking stickers all on his own!

I really have enjoyed these open ended art projects.  If you haven’t tried one with your kids, I highly recommend it!   The schedule posted at Mommies Wise Little Bookworms looks like:

  • Oct 21-27: Black and White:Glitter, Chalk, Paint anything goes
  • Oct 28-Nov 3: Pumpkins: Real, Collage anything goes
  • Nov 4- 10: Henri Matisse Collage (more in this in a week or so)
  • Nov11-17: Feather
  • Nov 18-24: Corn
  • Nov 25- Dec 1: NON Open Art: lets see those Turkeys!

I decided to participate (or rather, have the kidlet participate!) in the Open-Ended Art Projects posted over at Growing and Learning by Leaps and Bounds.  This week the theme is Fall Colors: Red, Yellow, Orange and Brown. [Apparently the creator of that site has elected to delete thier blog.  This was sudden, as they had posted open ended art for the rest of the month, and gave no indication it was coming]

While he normally has unlimited access to stickers, papers, drawing and coloring materials in his art cart, any thing else I usually have to dig out.  (The art cart is against a wall and its not that easy to turn it around in the corner I have it wedged in.)  We do a lot of projects, but anything that requires the mixed media / collage / messy stuff usually comes out with a purpose; more a guided art project. 

 So today I took a bag and wandered around the house raiding the art cart, the supplies closet, and my scrapbooking stuff to find a good assortment of items in the fall colors and then took the bag to the table and set it down and told him there’s a project on the table for him to do.  No other instructions.  I did put out some generic supplies — glue, glue stick, scissors, brushes and tape.

010

He started pulling things out, one at a time, examining each thing, especially if it was something he hasn’t used much or recently.

012

Everything dumped out, its time to start assembling!  Those are very sharp scissors he is using.  His child scissors would not cut the felt so he asked for help.  I got the super sharp bumblebees out and let him use them with cautions and close supervision.  He did just fine though.

020

The final product!  What is it?  “A scuplture collage for mommy”, or so he says!  Everything else went back into the bag for another day.  He has his eye on a spool of ribbon and says he wants to make shapes with the cookie cutters, but “not until another day.”  I’ll leave the bag handy this week and see if he digs in and makes anything else.  I think he really enjoyed the freedom of just doing whatever he wants